Concealer Techniques & Where You're Going Wrong

Concealer is one of those magical makeup products that can transform your beat; it can snatch, sculpt, and of course, conceal – it’s been known to hide all signs of late-night pizza parties in the past. However, if used incorrectly, it can actually make you look more tired, accentuate fine lines or emphasize skin texture.
So to elevate your concealer game to artiste level, we’ve outlined some common (but easy to fix) concealer mistakes and the techniques you should be using instead. Get ready for a concealer crash course..
Mistake #1: You’re Using the Wrong Shade
Finding the right shade for any complexion product is essential, but it’s a make-or-break moment when it comes to concealer. In fact, you might even want to consider having two shades in your makeup bag, one to brighten undereyes and sculpt the face, and an exact match that can conceal any areas on the skin and blend in perfectly with your foundation or natural skin tone.
The right technique: First up, you need to consider your undertone. Typically products either have a warm, cool, or neutral undertone to match your skin tone. Often brands can list this as gold or red (warm), blue (cold) or neutral, which means you have both warm and cool tones. Once you know this, you can find a shade that matches your skin tone more closely; look out for these letters at the end of a shade name or number to indicate the undertone: G (warm), R (warm), B (cool), N (neutral).
To conceal blemishes or pigmentation: Look for the closest match to your foundation; this means whatever you want to conceal will blend in easily and not stand out.
To brighten undereyes or sculpt: Use a shade that’s around two shades lighter than your foundation, which will create the illusion of fuller-looking skin and minimize shadows under eyes.
Posts You'll Love:
Mistake #2: You’re Using too Much Concealer
Our concealer application has gone on a real journey over the years. Gone are the days when we applied our concealer in a huge triangle shape under our eyes, which usually led to creasing, and let’s be honest, caking. Using too much concealer not only increases the chance of creasing but it can also accentuate fine lines and wrinkles. Thankfully, we’re now a lot more strategic with our concealer placement and customize our application depending on the look we’re going for and the formula we’re using.

To brighten the undereye: Typically, the three-dot method under the eye does the trick to hide dark circles and brighten the undereye area without looking cakey. Try not to apply the product too close to the lower lash line as this can make your eyes look smaller; a little natural shadow under the lash line can make your eyes appear naturally bigger.
@meghaess Facelift anyone? #facelift #concealerhack #makeuphack #makeuptricks #makeuproutine #itsaremix #gotthisforyou #makeuptutorial #skincareroutine #foryou ♬ BDASH Breathe – BDash
To snatch: If you’re a beauty lover, chances are you’ll be familiar with the new concealer technique that snatches the eye for a lifted and brightened final look. If not… DW, we gotchu! Start by placing a small amount of concealer under the outer corner of the eye (dragging it up and outwards towards the tail end of your brow), in the inner corner, as well as next to your mouth, around the nostril, and underneath the cheekbones. Blend outwards using a damp makeup sponge or concealer brush. When blending, be mindful not to drag your sponge as this can shift and diminish the coverage. Instead, lightly press it into the skin using small tapping motions.
For a natural, crease-less result: If your dark circles are concentrated around the inner tear duct (like most of us) you might not actually need to apply concealer to the outer corner of your eye. As the extremely talented MUA, Wayne Goss (a true beauty industry veteran), explains in his video below, it can actually make your eyes appear smaller and increase the chances of exaggerating fine lines. For a quick conceal, simply apply a small dab of formula underneath your inner corner and blend outwards. For more details on this technique, check out Wayne’s video below.
To increase coverage: Another great makeup hack you can thank the drag community for… To increase the coverage of any concealer, let the formula sit on your skin for one to three minutes before blending (experiment to see which timing works best with your formula). This technique is called cooking! Essentially, this ‘drying’ time allows the concealer to start setting into your skin, which means that when you go to blend, it’s almost semi-dry, so it doesn’t disappear immediately into your blending tool of choice.
To increase coverage, build it in thin layers instead of piling it on all at once. This will create the most natural yet flawless second-skin finish.
Mistake #3: You’re Applying Your Concealer With The Wrong Tool
It shouldn’t come as a surprise that your concealer tool is another major factor to consider and depending on the tool, you can achieve fuller coverage or a more natural finish. For example, if you use a damp makeup sponge with a full coverage concealer, it will stretch out the coverage and create a more natural skin-like finish.
Depending on your preferred coverage, try one of these techniques:
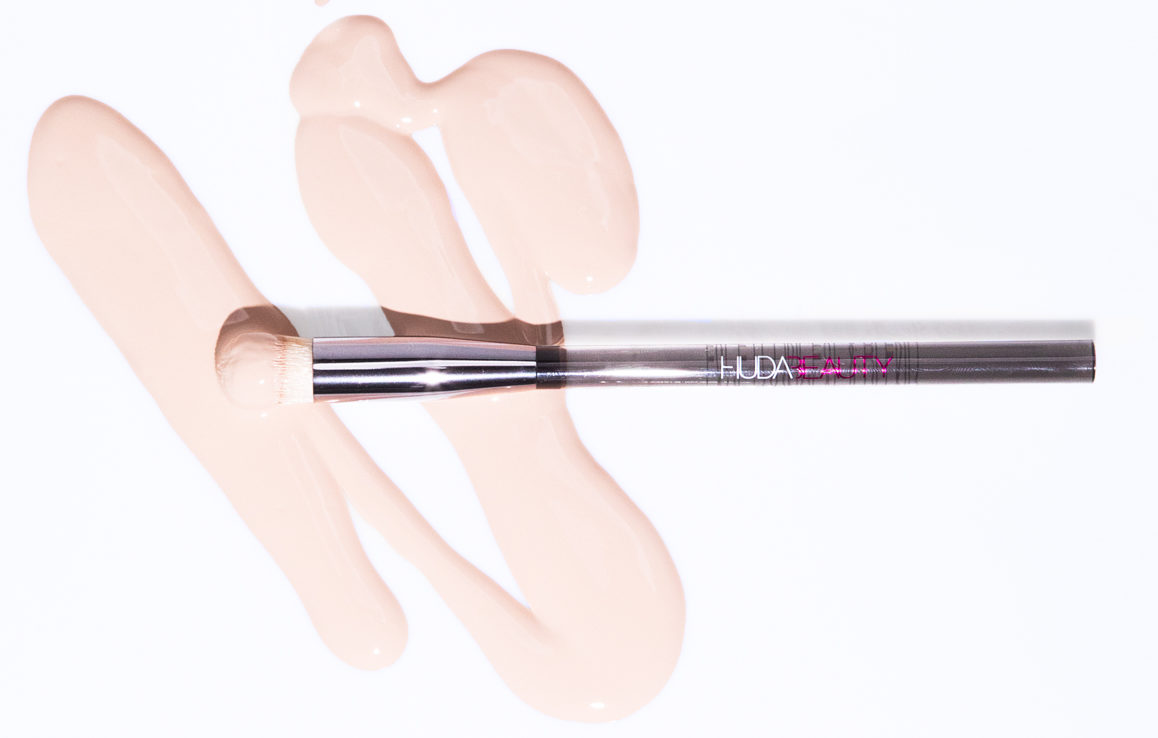
Brushes for full coverage concealer application: If you want a more full coverage finish, use a concealer brush and gently tap the product into your skin, then blend outwards for a seamless finish. Our go-to tool? Our new Conceal & Blend Brush (dropping June 13th), which has been specifically created to optimize coverage while giving an effortlessly blended finish every time. The domed-shape design with densely packed synthetic fibers seamlessly buffs concealer into the skin for a natural, second-skin finish.
Alternatively, you can’t go wrong with the Real Techniques tools for a flawless finish on a budget. We recently tried TikTok’s fave Real Techniques concealer brush and have been obsessed ever since.
Makeup sponges for a natural skin finish: For a more sheer finish, a damp makeup sponge gives the best result. Apply your concealer to your skin and bounce the damp makeup sponge on top to blend it in. Even if using a brush, using a makeup sponge as the final step gives the most airbrushed finish. If you want more coverage but the same airbrushed finish, let your concealer set for a couple of minutes before you blend with a sponge.
Fingers for coverage & a natural finish: The finish will be super natural as the heat of your fingers will warm up the product so it blends effortlessly into the skin. Whatever you do, don’t drag the product or pull the skin as this will make your concealer look streaky. Tap lightly into the skin, instead.
Application tips for pimples: When covering pimples, it’s important to apply your base first, so apply a sheer layer of foundation or tinted moisturizer before applying concealer. Also, remember, it’s best to layer the concealer gradually, so start with a thin layer, let it sit, then use a brush or damp sponge to blend and repeat if you need added coverage. Finally, for long-lasting wear, set your concealer with a light dusting of powder, but more on that later…
Mistake #4: You’re Not Setting your Concealer
Setting your concealer is another make-or-break moment. Without setting powder, your concealer is more likely to move into fine lines and wrinkles and crease throughout the day. Setting your liquid complexion products with powder can also help brighten and smooth the skin for a more flawless finish that lasts all day long.
The right technique: When it comes to setting your makeup, you can either apply a light dusting of powder to set and minimize shine, or you can bake (leaving a thick layer of powder on the skin for a few minutes) for a more intense, long-lasting finish. For a quick set, simply grab a large fluffy brush and dip it into a setting powder, like our Easy Bake Loose Setting Powder, $35, then sweep it under your eye, as well as any areas that tend to get oily, like your T-Zone or cheeks.
Baking: For a look that stays in place all day, once you’ve blended your concealer, dip a damp makeup sponge into your setting powder, then apply a layer of powder using a dabbing motion to the under-eye area. Let the powder bake for two to five minutes and then gently dust away the excess powder with a soft, fluffy brush.
Mistake #5: Your Concealer is Drying/ Caking
One concealer concern we often hear is “my concealer looks dry or cakey,” which can be a result of naturally drier skin in this area, a less creamy or drier formula, or it could be that the skin hasn’t been prepped properly.
The right technique: If you find that concealer often looks dry on your skin, look for creamy-textured and hydrating blends as the added surge of moisture will make your skin look plump and it can also prevent concealer from looking dry or settling into fine lines. We’re obsessed with our new concealer, the #FauxFilter Luminous Matte Concealer, $29. It feels super hydrating and comfortable on the skin, it builds effortlessly, blends like a dream, and doesn’t crease. You also can’t go wrong with the cult classic Maybelline Instant Age Rewind Eraser Dark Circles Treatment Concealer, $11, as a more affordable hydrating option.
Prepping the undereye is another quick and easy way to prevent your concealer from looking cakey or dry. First, make sure you’ve hydrated the area with a thirst-quenching moisturizer like our WISHFUL Honey Whip Peptide Moisturizer, $43. If you want to go the extra mile, applying an eye serum like our WISHFUL Eye Lift & Contour Serum, $45, underneath your moisturizer will help smooth the skin, as well as target dark circles with continual use. Finally, finish with an ultra-hydrating primer like our Water Jelly Primer, $33, as it leaves your skin looking dewy and delicious.
Now you know how to conceal like a pro, check out our go-to jawline snatching techniques.


 Daily Habits Will Give You Better Skin")


 Transformed Our Skin On Another Level")
Leave a comment