How To Apply Eyeliner Like A Pro – The Insider Tips
 Source: Jason Merritt/Getty Images
When it comes to makeup application, there’s nothing worse than screwing up your eyeliner. It’s arguably one of the most common beauty products we use, so application should be a pretty straightforward process, but IRL, it’s one of the hardest – you’re battling with bleeding, smudging, and the dreaded panda eyes. Those who’ve nailed the art of liner in any of its numerous forms – liquid, gel, pencil, crayon – we salute you! For those of you who haven’t got the hang of it just yet, we feel your pain, but don’t worry we’ve got you…
The thing is, when eyeliner is done well, it can accentuate your eyes and create a fierce finished look. However, when it’s done poorly, it can do the exact opposite – sometimes even to a distracting or, “Oh honey…no” level. To help you better master the art of applying eyeliner, we hit up the pros, aka the makeup artists whose job literally requires them to do it perfectly. Here’s how to apply eyeliner like an absolute pro:
Step 1: Use The Best Products
“Quality eyeliner doesn’t just consist of beautiful packaging,” notes celebrity MUA Gina Brooke, who’s worked with Gwen Stefani, Anne Hathaway, and Kim Kardashian. “High-quality products are essential and a prerequisite to stocking my kit. Products must be long-lasting, smudge-proof, go on super-smooth, and be a highly pigmented formula that won’t dare bleed.” So stay clear on any poor-quality liquid and gel eyeliners: any product that skips, smudges, transfers, bleeds, and has little-to-no staying power.
“You can always tell a liner is a quality one by the amount of consistent pigment payoff it gives,” adds Shalini Vadhera, makeup artist to celebs like Nina Dobrev. “For example, a black liquid pen liner should apply smoothly and with deep pigment and should not fade to gray or lose its pigment in the middle of the line.”
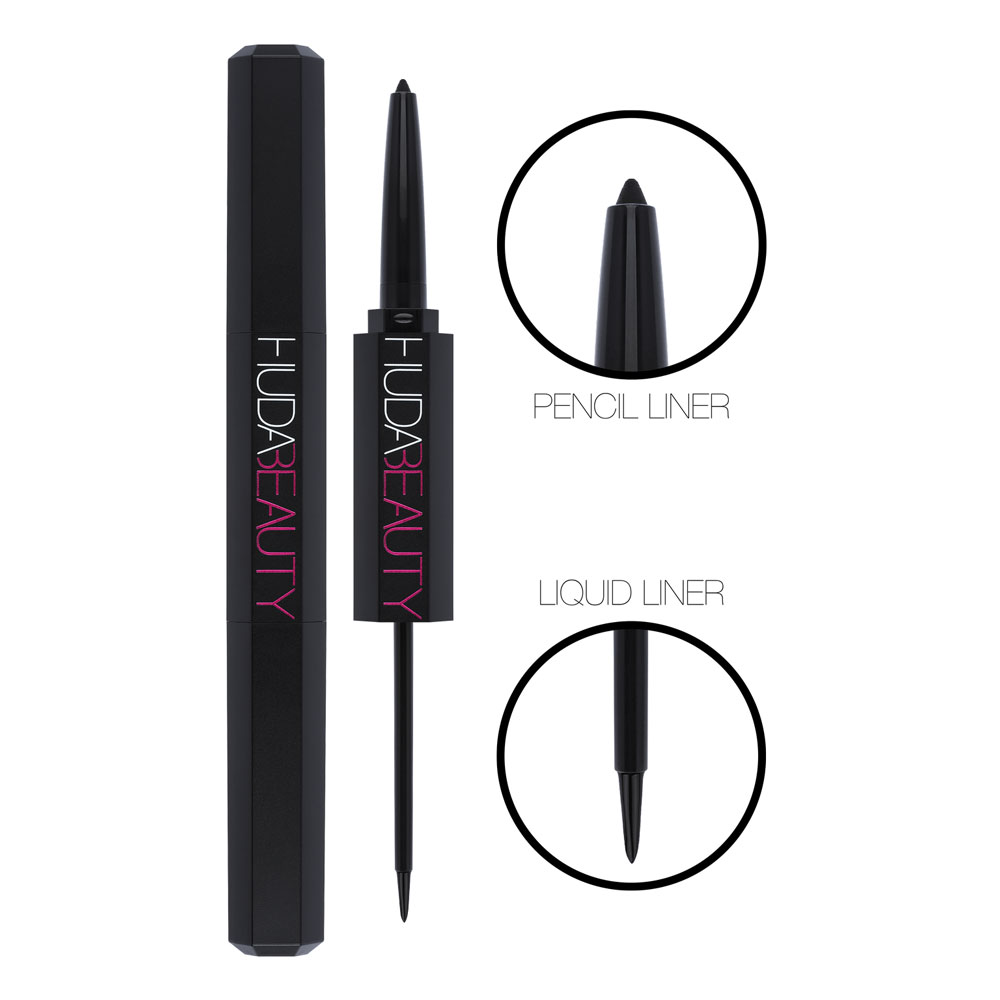
Our new Huda Beauty Life Liner is a dual-ended eyeliner with a liquid tip one side and pencil on the other. It’s the most intensely matte black eyeliner we’ve ever tried, plus it’s super long-lasting (the liner has 48-hours wear!!), waterproof, smudge proof and fade proof. Find out all about Life Liner here.
One of Vadhera’s favorites is the Kat Von D Tattoo Liner, $20. Some other seriously bomb options include Maybelline Eye Studio Gel Liner, $7, and Bobbi Brown Long-Wear Liquid Liner, $38. If you’re using a gel, sometimes the assistance of a great brush can make all the difference, as well. Brooke says two of her favorites are Chanel’s Les Pinceaux de Chanel Eyeliner Brush, $32, and the Shu Uemura Brush 2R Define Eye Brush, $18, for max precision.
Posts You'll Love:
Dry pencil eyeliners should be soft, but still firm, and rich in color. If they’re super waxy or hard, that makes them trickier to apply which can lead to a poor finish. Vadhera recommends soft kohl kajal liners that are high in pigment and don’t harden even after they’ve been sharpened a dozen times. Milani’s Supreme Kohl Kajal Eyeliner Pencil, $7, gets rave reviews, as does Urban Decay’s define 24/7 Glide-On Eye Pencil, $21, which comes in 31 shades – how insane?
Step 2: Learn the Art (We’ve Got Pro Tips!)
1. Make Sure Lids Are Taut
One of the biggest frustrations when applying liquid or gel eyeliner is dealing with a brush that skips. This happens if the canvas – AKA your upper eyelid – isn’t perfectly smooth. Brooke says, “It helps to hold the outer eye taut and apply the liner from inner corner straight to outer corner. By holding the skin taut, it makes the drag on the liner super easy.” Keeping your mirror low and looking down helps tremendously, as well.
2. Try the Dot-to-Dot Method
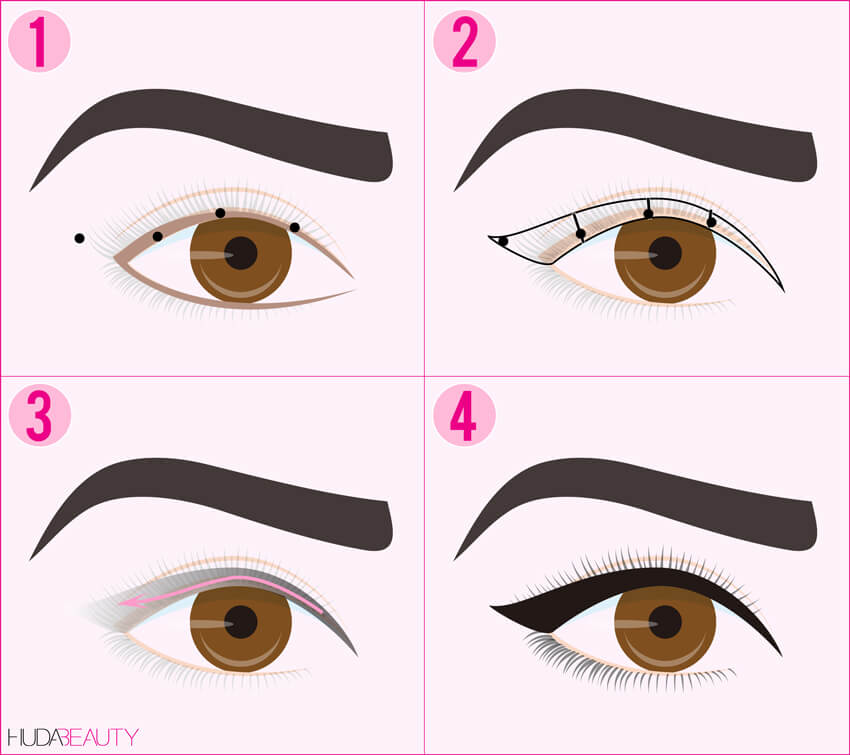
“I love the dot-to-dot method on liquid liners, especially the ones with flimsy brushes or if you have unsteady hands,” says Brooke. “Create a line of dots on the upper lash line that are close to each other and then connect them with a straight line to create the perfect liquid liner.”
3. The Tape Method Works Too
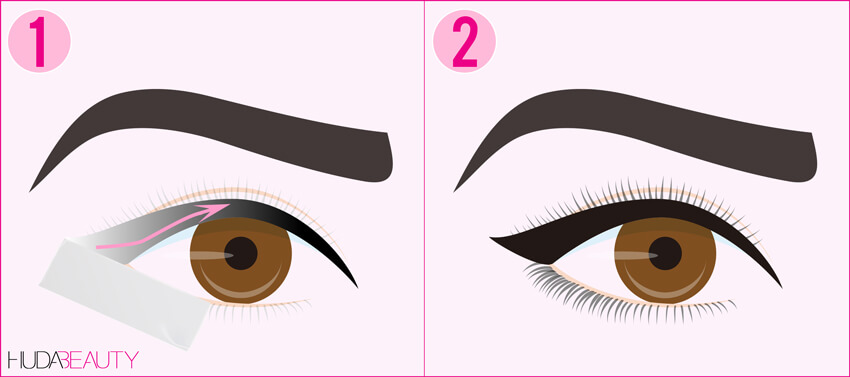
Liquid and gel cat eyes are notoriously difficult, but you can get them right. Even the most experienced of pros will apply a line of tape, then draw the flick. Once the tape is removed, you’re left with a super crisp line. Scotch tape works, but e.l.f. Cosmetics’ Line & Define Eye Tape, $2, is specifically skin-approved. At a push, you can always use sticky notes, which btw, work really well (check it out here)!
4. Smoke It Out

This tip is for pencil liners. Sometimes a hard line against your lashes can be too rigid and stark. It can even make your eyes look smaller than they are. To combat this, carefully line your upper lash line and the outer corners of your lower lash line with your pencil, then smoke it by gently rubbing an angled eyeliner or smudge brush back and forth. The result is a soft, gorgeous, smoky eye.
5. Dull Your Pencil
It seems counterintuitive, but you don’t want to use a super sharp point. Pencils tend to break off mid-application if they’re too sharp, so Vadhera says to “gently dull the point on the back of your hand.”
6. Mistakes Happen, It’s No Big Deal!
“If you make a mistake, gently dip the edge of your slanted brush into oil – rose oil or blue tansy (a little goes a long way) – and wipe clean to perfection,” says Brooke. DHC Olive Virgin Oil Swabs, $8, are already pre-infused and individually packaged, making them super handy. We also love Sir John’s hack of sucking a cotton bud – saliva works too, and it’s definitely the easiest and quickest solution!
Step 3: Practice Makes Perfect
 via Giphy
This is the best part about makeup, right? Experimenting with new products, trying new tips and tricks, and practicing until you finally perfect the art. Just like anything, eyeliner application takes time and patience, but you’ll get the hang of it quicker than you think. Happy lining!
Let us know your fave eyeliner in the comments below.


 Daily Habits Will Give You Better Skin")


Leave a comment