10 Things You Need to Know Before You Get Your Next Piercing
 Source: Jim Spellman/Getty Images
Your first piercing is like a rite of passage – you go in with your BBF, and you come out with bedazzled lobes and a major buzz. But while your lobe piercing ‘first’ is relatively pain (and risk) free, when you begin to explore other areas of the ear and around the body, it gets a little more complicated. The thing is, piercing is an art, and it’s also a major change for your body, which means the piercing process needs to be completed with care. So before you think about pulling a ‘Parent Trap’ and grab a needle and an apple, think again…
 via Giphy
If you want to avoid infection and have the fiercest piercings, listen up! We spoke to the legend of the piercing world, the founder and designer of cult piercing parlor, Maria Tash. Maria has decorated some of the most famous faces (well, ears) in fashion, from Beyoncé, Hailey Bieber, and Ashley Graham to Zoë Kravitz and Kylie Jenner – the list literally doesn’t stop! Here’s everything you need to know from the piercing queen…
1. Do Your Research
View this post on Instagram
“It’s very helpful to have an idea of what type of piercing you can see yourself wearing and loving. Using social media is a wonderful way to see options. Instagram has thousands of inspirational images with interesting placements and jewelry options,” Maria advises. So before you schedule an appointment, get an idea of what you’d like, but be prepared to be flexible, as your personal dimensions may not suit your ideal piercing (but we’ll explain more about that later).
As well as researching your piercing, check out the piercing parlor and ALWAYS read the reviews. We’d even recommend stopping by for a visit to check out their cleaning standards; don’t be afraid to ask questions! Maria points out, “Your piercer should make you feel comfortable and answer all of your questions respectfully before you get pierced.”
2. Pick the Right Piercing for You
View this post on Instagram
We never realized just how much thought should go into a piercing until we spoke to Maria, who explained her process for the perfect piercing: “It’s really an art to style jewelry to the body. Firstly, I consider metal color and choose what’s most flattering to the skin. Then I look at the anatomy and see if there are any scars, moles, or non-proportional ear or facial features that I want to use jewelry to either directly cover up or detract from a viewer’s gaze. The opposite is true, too; if there is a feature to play up, I will use jewelry to draw attention to that feature, for example, eye color. You also have to consider previous piercing placements and angles and select jewelry or pierce to make any old piercing locations that may not have been optimal, look deliberate.”
 Source: Instagram | @mariatash
Then you need to consider the anatomy of the ear to ensure that it’ll fit properly. “A well-fit piece of jewelry is like clothing that has been tailored to your body. And since pierced jewelry is worn continuously, sometimes for years, a good fit is not only integral for an easy heal and continued comfort but also for optimal beauty. My stylists custom fit the diameters of rings to the client’s unique anatomy.”
“For studs, many locations on the ear and body require a slightly longer post [the part that sits in the hole] for healing, and it is our policy to offer a free shorter (or longer) post to guarantee the jewelry will sit flush and become a kind of second skin.” Because a fresh piercing will often swell, if the post is too short, it will put pressure on the area, and it’s more likely to become infected. This means a longer post is preferable for piercing to give the piercing room to swell, but after around eight weeks (or longer for a cartilage piercing), when the swelling has completely gone, a shorter post will sit more comfortably and won’t dig in.
View this post on Instagram
3. Think Ahead
Piercings can be super addictive – especially when you see the gorgeous jewelry collections Maria has designed – so you’ve got to think about the long game (the Maria Tash Instagram page is seriously addictive!). Head piercer at Maria Tash Dubai, Danielle Robinson, told us “You’ve got to curate your ear.”
Maria explained to us that “A well-curated ear is not about quantity, but quality. Jewelry should be layered in a way that fits really well with the wearer’s anatomy, matches their personal aesthetic, looks deliberate, and tells a story. We usually encourage no more than 3-4 piercings done in one sitting on an ear so as not to delay healing by taxing the body too much. I have done more than this on a case-by-case basis.”
Danielle points out, “You’ve got to take into consideration things like which side you mostly sleep on. Sleeping on a fresh piercing will obviously hinder the healing process. Therefore, if you plan on having a couple of piercings done in one sitting, we recommend you work on one side first and give it the appropriate time to fully heal before adding to the other ear. This relates to everything on the ear other than lobe piercings, as they tend to heal a little quicker than other areas.”
The process of a tragus piercing, by Danielle Robinson:

4. Know your Healing Times
When you get a new piercing, you need to be fully prepared for the healing process. It may take a lot longer than you initially expected.

Lobes: (lower and upper): 2-3 months
Cartilage: (helix, forward helix, conch, contraconch, tragus, anti-tragus, rook, tash rook, and daith) 6-12 months
Nostril: 6-12 months
Septum: 3-5 months
Nipple: 8-12 months
Navel: 6-9 months
Dermal: 2-3 months
5. Pick your Metal Carefully
View this post on Instagram
Choosing the right metal is another factor you need to consider. Maria told us, “I love 14k and 18k nickel-free gold. It’s important to choose a color of gold for your jewelry that resonates with your skin tone and best flatters you. Maria Tash stylists are well trained in selecting gold tones that work best for making a style stand out or blend in with your complexion. Hypoallergenic metals that are nickel-free or medical grade are important to minimize any reaction and hence speed healing times.”
6. Gun Vs. Needle
When we asked Maria if she prefers a gun or a needle, she was adamant; “A needle! Guns are not used in the professional piercing industry. It is difficult to control the angle of the piercing, there’s a fixed length to the studs, and the studs tend to be thick. The word ‘needle’ sounds scarier, but our needles are so sharp they elegantly glide through the skin causing barely any discomfort – and they push the skin to the side to make way for the jewelry.” Speaking from experience, we have tried both gun and needle, and we were shocked at how unpainful the needle was, even when we had cartilage pierced – it hurt less than a gun in our lobes!
The process of a tash rook piercing, by Danielle Robinson:
7. Choose your Piercing (Back) Wisely
While most earrings come with a standard butterfly back, for cartilage piercings, Danielle recommends a threaded backing (it’s smaller than a butterfly and screws onto the end of the earring). Danielle explains, “There are numerous differences between the two that either hinder or improve the healing process. The premier difference is the quality of metal: most, if not all, butterfly back pieces are made from a cheaper material that contains large quantities of nickel. Nickel is the utmost prominent factor in allergic reactions for healing piercings.
“A second factor is the length of the butterfly back posts. If post length is too short to allow for the initial swelling of your fresh piercing, you will experience what is called ’embedding.’ This is where the swelling becomes significant enough to swallow the butterfly back. At Maria Tash, your initial post length takes this into consideration with a longer bar to allow for this swelling. Then, at a later stage, you can change to a shorter, more comfortable post length.”
8. Make Sure Everything is Sterilized
Sterilization is THE key step in avoiding infection. If your piercing isn’t properly sterilized, it will get infected – it’s that simple. Your piercing should be opened in front of you, and your piercer should be wearing sterilized gloves. They should also use a sterilized alcohol wipe on the area that’ll be pierced to ensure it’s clean.
View this post on Instagram
9. Aftercare is Essential
When you spend so long deliberating and curating your ear, the last thing you need is an infected piercing. Here are Maria’s top tips for avoiding infection:
- Do not touch a healing piercing with dirty hands.
- Most people do not realize that cell phones, keyboards, and door handles are breeding grounds for bacteria. It is important not to immediately touch your healing piercing (which is a fresh minor wound), which could transfer something to your skin.
- Keep an awareness of cleanliness and what can inadvertently touch your piercing throughout your healing period.
- It’s important to use clean bedding and towels. Keep pets and pet dander off pillowcases while you are healing.
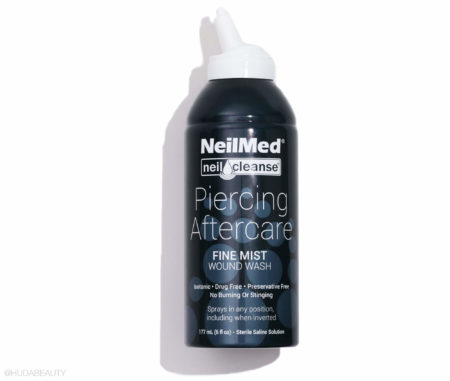
- Clean your piercing twice per day with a very mild cleaning solution, like sterile saline, so your skin does not get irritated from harsh products. We recommend the NeilMed NeilCleanse Piercing Aftercare Fine Mist, $10.
- At Maria Tash, you can come by for a free checkup about 4-6 weeks after your piercing. Maria encourages clients to have a piercer inspect the front and back of the skin as well as the fit of the jewelry.

10. Know How to Treat an Infection
It’s important to recognize the first signs of infection so you can quickly treat it before it’s too late and the piercing needs to be removed. Look for signs like redness, heat, distended tissue, and then consult with a piercer to rule out irritation or begin treating the infection.
Maria explains that “Redness and swelling can most commonly come from a tight fit of jewelry and is easily fixed with a quick change of post length or ring diameter. I would also rule out irritation from an aftercare product. If it’s determined infection is present, it is best to make sure that the jewelry has enough room to breathe by adjusting fit if necessary, and to allow any infection to drain out of the piercing by keeping the jewelry in and soaking the area in very warm sterile sea salt. In more advanced cases, a round of antibiotics plus a change of fit and sea salt soaks will be the solution.”
If your piercing gets infected and forms a small bump, you can also try applying antibiotic cream, like Fucidin, twice a day. This helped to clear up an infection in a week! Start by bathing the piercing in sterilized sea salt water, then gently pat dry and apply Fucidin.
We don’t know about you, but seeing all these gorgeous piercings is majorly making us crave one! Let us know if you’re planning on getting a piercing and where or if you have any questions, in the comments below.


Leave a comment