


How To Use Setting Powder To Airbrush & Lockdown Your Makeup!

As far as beauty staples go, our beat wouldn’t be the same without setting powder. Seriously, on a recent vacay, the moment we realized we’d forgotten setting powder, a pit formed in our stomach. It seems dramatic, but honestly, our beat just isn’t as flawless, effortlessly snatched, or as long-lasting without it… Just think of the holiday snaps…
If you’re not (yet) a ride-or-die setting powder lover like us, let us explain the setting powder basics, how to use setting powder properly, and all our pro makeup tips that will take your entire beat to the next level. Consider this your setting powder masterclass.
What is Setting Powder?
A setting powder is a finely-milled powder that is used to set liquid complexion products, but it can do SO. MUCH. MORE! A good setting powder helps increase the longevity of your makeup, combats midday shine, and gives your complexion an airbrushed finish. It can also be used in a way that snatches your cheekbones, contours your nose, and lifts your face. There are typically two types of setting powder – pressed and loose – but we’ll get into all of those deets in a hawt minute.
How to Use Setting Powder:
Setting Powder Tip #1: Find the Right Formula
Let’s get straight to it: you can choose between loose and pressed powder, and they each have their own unique benefits. Here’s how they differ so you can find the right formula for your daily needs.
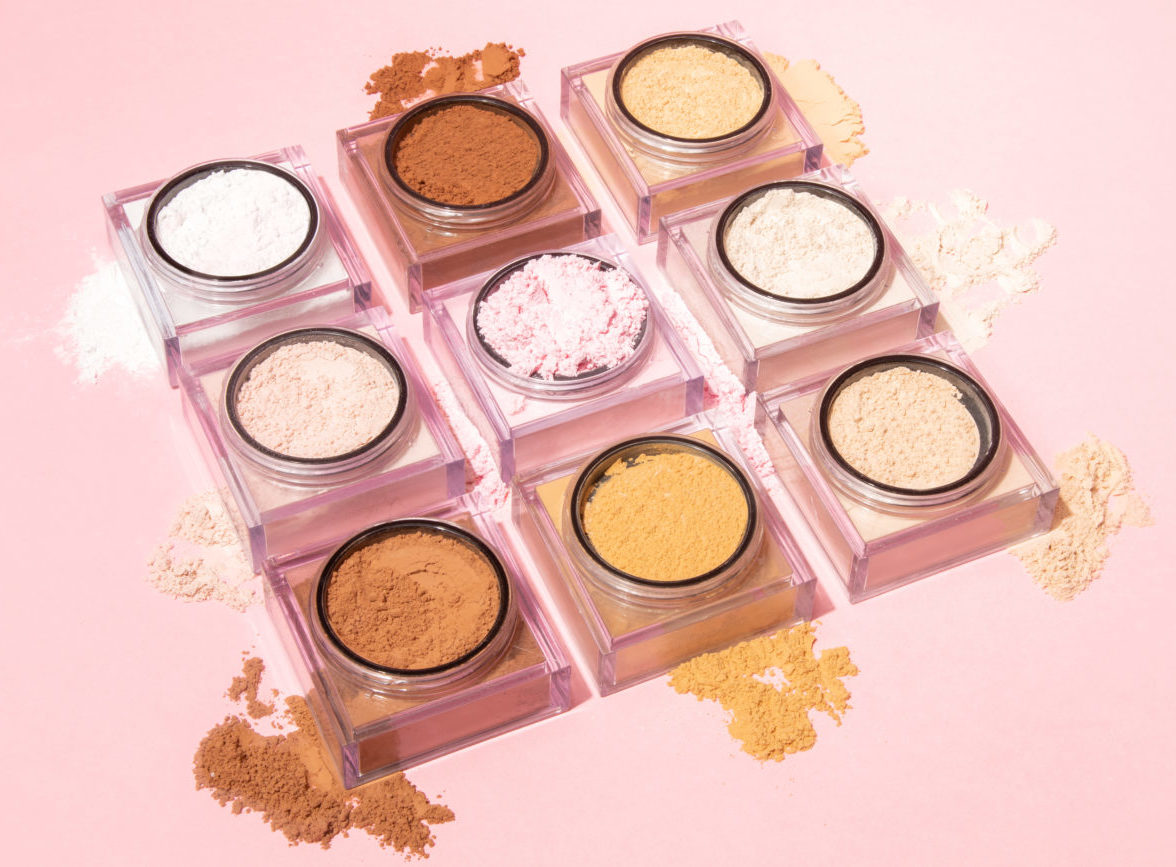
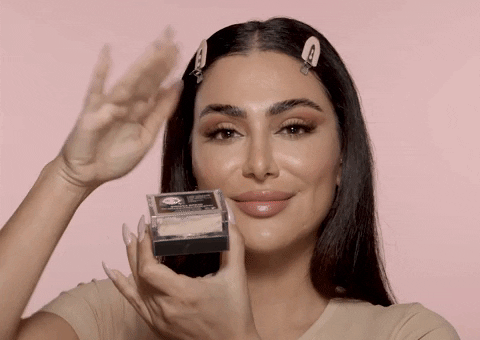
Loose setting powder: A loose setting powder is a finely milled powder (the finer, the better) that blends and melts seamlessly with your makeup to increase the staying power and provide a smooth-skin finish. Our go-to is the Huda Beauty Easy Bake Loose Setting Powder, $35, as its smooths and snatches like no other; plus, there are eight shades, so you can find one to blend effortlessly with your look.
How to use loose setting powder: She’s a multitasker, to say the least. Opt for a light dusting of powder to set, smooth, and mattify, or you can use loose powder for baking your makeup, AKA when you apply a thick layer to different areas of your face to brighten and sculpt.

Pressed setting powder: Pressed powder is (you guessed it) a pressed, finely milled powder that delivers a soft veil of coverage, typically with a softer, more natural finish than loose powder. It’s also great for mattifying touch-ups on the go, smoothing skin texture, and increasing the longevity of cream formulas. Wear pigmented pressed setting powders alone or on top of your other complexion products.
The GloWish Luminous Pressed Powder, $33, is always our first choice as it leaves your skin with this beautiful natural glow and is infused with hydrated ingredients like Damescana rose oil, so it never feels dry. As it contains pigments, you can actually apply it instead of foundation using a medium-dense, large fluffy brush for no-makeup makeup days – we’re obsessed. You could also try the Charlotte Tilbury Airbrush Brightening Flawless Finish, $49, which comes in two translucent shades for setting makeup.
Setting Powder Tip #2: Find the Right Setting Powder Shade
Finding the right shade for any complexion product is like cracking a cheat code. While you’ll find many loose powders are transculent, some can leave a white cast, so we always recommend finding a shade that complements your skin tone. It’s also important to note that you may require different shades depending on your desired result.
For example, if you want to brighten and bake your undereyes or under your cheekbones, look for a shade that’s two to three shades brighter than your complexion. Pink powder, like our Easy Bake Cherry Blossom shade, works best for brightening fair to medium skin tones, and yellow-toned powders, like the Easy Bake Banana Bread shade, give the most stunning brightening results for medium to rich skin tones.
If you’re looking for a powder to set your look with a natural finish, opt for a pressed powder that has a similar shade to your foundation hue. Check out our shade guide here.
Setting Powder Tip #3: Find the Right Tool

When it comes to setting powder, there are so many different tools you can use to get the look you want to achieve, but here are the three tools we always reach for:
A loose fluffy brush: A loose fluffy brush is a versatile sista. She can be used to apply a light dusting of powder to your beat to set and add coverage or to mattify areas you typically get shiny, like your T-zone. She’ll also lend a helping hand when baking your makeup to remove excess powder.
A damp makeup sponge: A damp sponge is essential for baking as it allows you to pick up enough powder to bake. Check out our Basic B Sponge, $17, which helps evenly layer the powder onto your skin for a more seamless final look. You can also use a damp makeup sponge to press loose and pressed powders onto your skin to get a really airbrushed finish.
A powder puff: The powder puff has made a serious comeback, and we STAN by it. It may be old school, but it also allows you to press powder into your skin for a smoother, airbrushed finish. It’s also a great baking companion.
Setting Powder Tip #4: Prep Your Skin for Powder
We realize there’s a ton of info, so we’ll keep things short: if your skin is dry or you haven’t exfoliated recently, your setting powder is more likely to settle into fine lines or crease in smile lines, thereby making your skin look dry and flakey rather than smooth.
To avoid this, exfoliate your skin regularly to ensure you have a smooth canvas for application. Of course, for this step, we always grab the WISHFUL Yo Glow Enzyme Scrub, $39, which is enriched with papaya and pineapple enzymes to remove dead skin while amping up your glow game. J’adore!
The next step is hydration. For the undereye area, we love the WISHFUL Eye Lift and Contour Peptide Serum, $45, as it’s super lightweight and hydrating, but it also tightens the eye area for a smooth finish. Then, we seal in all that glazed, juicy goodness with the WISHFUL Honey Whip Peptide Moisturizer, $43, as it’s enriched with nourishing manuka honey and restorative peptides and creates the perfect canvas for makeup.
Posts You'll Love:
Setting Powder Tip #5: Lay Your Complexion Base to Perfection
As setting powder is used to set cream formulas, you need to ensure you a) have a creamy formula for your powder to grip onto, and b) that these formulas are buffed and blended to perfection. We recommend always bouncing a damp makeup sponge over your complexion at the end to ensure your products are perfectly blended with no brush strokes. It will also remove excess formula that could cause caking.
For a cake-free and snatched base, we love to use the Huda Beauty #FauxFilter Luminous Matte Concealer, $29, as it’s easy to build and adjust the coverage, but it’s also lightweight and doesn’t crease or look cakey. Talk about ticking all the right boxes!
Setting Powder Tip #6: Use Setting Powder to Bake
 via Giphy
Baking is one of our all-time fave makeup hacks. It involves applying a thick layer of loose setting powder on top of your cream complexion products. It’s typically done to brighten the undereye, but you can also bake your chin, nasolabial folds, and the center of your forehead to set your makeup – basically, any areas of your face where makeup tends to crease or is prone to oiliness.
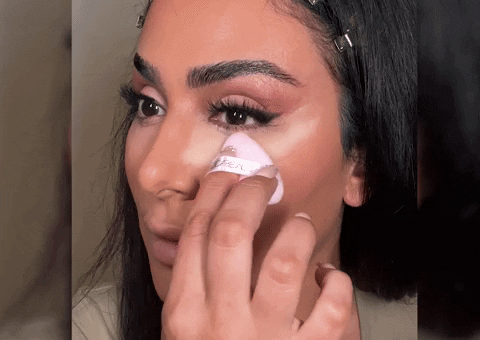
How to Bake: Dab a heavy layer of a loose setting powder onto areas you want to bake using a damp makeup sponge or powder puff. Allow the baking powder to sit on your skin for three to five minutes, then sweep off the excess with a loose fluffy brush. The final result? A budge-proof beat that looks almost filtered. Read our baking guide for more tips!
Setting Powder Tip #7: Use Setting Powder to Snatch
 via Giphy
Now we’ve covered the baking basics, here’s the real baking tea. If you’re a TikToker, you’ll know what’s up *wink wink.* When placed strategically, a loose setting powder (in your brightening shade) can also be used to snatch the natural contours of your face for a more sculpted, lifted final look that lasts day to night. Literally, you don’t even need to contour!
@hudabeauty Facelift hack IB @Victoria Lyn 💄 #concealerhack #hudabeauty #foryou #xyzbca #fauxfilter Concealer #hudabeautyeasybake @hudabeauty ♬ original sound – Huda Beauty
First, apply your brightening concealer shade to the inner and outer corners of your undereye, and for an extra snatch, from the outer corner of your mouth in a line under your cheekbone. Once you’ve blended out your concealer, pack on your loose-setting powder using a damp sponge or powder puff. Wait three to five minutes, then dust off the excess powder using a fluffy brush. Et voila! You’re snatched.
Setting Powder Tip #8: Use Setting Powder to Control Oil
If you have oily or combination skin and are prone to midday shine, setting powder will be your BFFL. Simply grab a loose or pressed powder and a large fluffy brush and dust your entire beat with a light coating of powder. Alternatively, for a more glowy base, you can just apply powder to your T-zone.
If touch-ups throughout the day are necessary, stash a pressed powder in your purse with a powder puff and press it into your skin to mattify on the go.
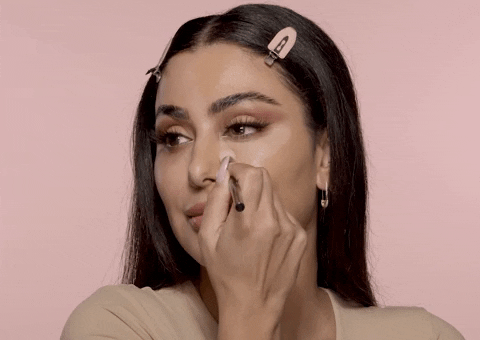
Setting Powder Tip #9: Use Powder To Set Your Undereyes
Rather than baking, you can use setting powder to set your undereyes lightly. Dip a small round, medium-fluffy brush in powder, and lightly press the brush into your undereye. This will prevent creasing, brighten, and set, and complements a no-makeup makeup look more effortlessly.
Setting Powder Tip #10: Use Setting Powder on Your Lids
If you find your eyeshadow, or any other cream products on your lid, are prone to creasing, setting powder will (as per) save the day. All you need to do is take a small fluffy brush and dust your entire lid with setting powder after using cream products and before applying your eyeshadow. This will soak up any excess oil, prevent your shadow from creasing, and boost the staying power.
Pro tip: For brighter eyes, apply a thin layer of concealer to your eyelid – literally, just use any excess product remaining on your makeup sponge or brush – before setting with powder.
Setting Powder Tip #11: Use Setting Powder on Your Pout
We discovered this lip-setting hack thanks to Mario Dedivanovic, AKA Kim’s MUA. By applying a thin layer of setting powder on top of lipstick, it remains smudge-proof no matter what you do.
How to: After applying matte lipstick, use a densely-packed flat brush, pack the translucent powder onto your lips, leave it to set for three to five minutes, then dust off the remaining powder. Finish by adding one final layer of color by dabbing the lip with lipstick.
For more setting powder tips, check out our debate on setting powder Vs. setting spray.